Salesforce
Salesforce is the world's leading CRM platform for managing customer relationships, sales, service, and marketing.
Authentication Types
Salesforce supports 3 authentication methods:
- Willow OAuth - Use Willow's managed Salesforce app. A Salesforce admin installs it once, then every user connects with their Salesforce account.
- Pros: No Salesforce app to create or credentials to manage
- Cons: Requires a one-time package install in your Salesforce org, and a user login, so it does not suit background agents
- OAuth - Create your own Salesforce External Client App. Every user connects with their Salesforce account.
- Pros: Full control, per-user tracking, production-ready
- Cons: Requires Salesforce admin access
- Client Credentials - A service account with no user login. Every call runs as one Salesforce "Run As" user.
- Pros: Works for background agents and automations
- Cons: No per-user identity in Salesforce; requires Salesforce admin access
Salesforce has no API key option. For a background agent, use Client Credentials.
Configuration
Before using the connector, you need to configure:
- Salesforce Instance URL - Your Salesforce instance URL (e.g.,
https://yourcompany.salesforce.com)
Setting up Willow OAuth
Salesforce only lets users sign in to an app that is installed in their org. Willow's app ships as a free managed package (namespace willow), so a Salesforce admin installs it once before anyone connects.
1. Install the Willow package in Salesforce
- Log in to Salesforce as an administrator and open the install link for your org:
- Production or Developer Edition: https://login.salesforce.com/packaging/installPackage.apexp?p0=04thm000003XwI1AAK
- Sandbox: https://test.salesforce.com/packaging/installPackage.apexp?p0=04thm000003XwI1AAK
- Choose Install for Admins Only and click Install. The package only adds the Willow External Client App: no objects, fields, code or data.
- When the install finishes, the app appears in Setup -> Apps -> External Client Apps -> External Client App Manager as Willow.
The app asks for these scopes:
- Manage user data via APIs (
api) - read and write records, limited to what each user's profile and permission sets allow - Perform requests at any time (
refresh_token,offline_access) - keep the connection without signing in again
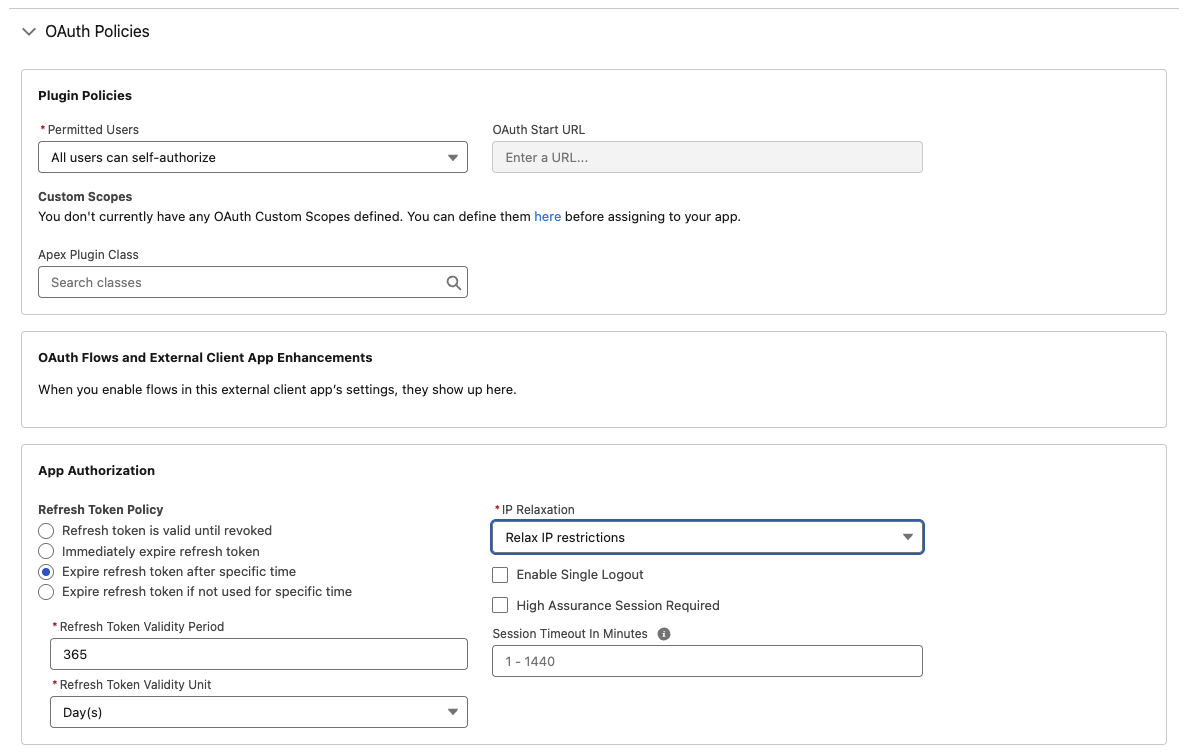
By default, every user in your org can connect. To limit it, open Willow in the External Client App Manager -> Policies -> Edit, and under OAuth Policies set Permitted Users to Admin approved users are pre-authorized. Then assign the app to the profiles or permission sets that should use it.
2. Connect in Willow
- In Willow, create a Salesforce MCP server (or open an existing one) and choose Willow OAuth as the authentication type
- In Configuration, set Salesforce Instance URL (e.g.,
https://yourcompany.my.salesforce.com) - Click Save Changes. Each user then clicks Connect and signs in with their Salesforce account
Setting up OAuth
-
Log in to your Salesforce org as an administrator
-
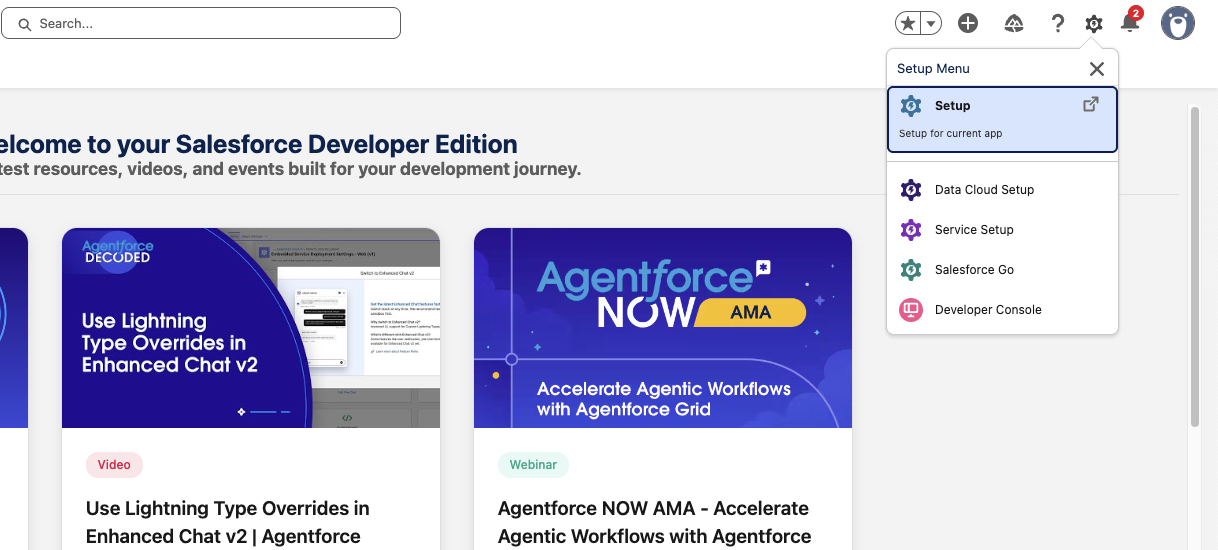
Go to Setup (gear icon in the top right)
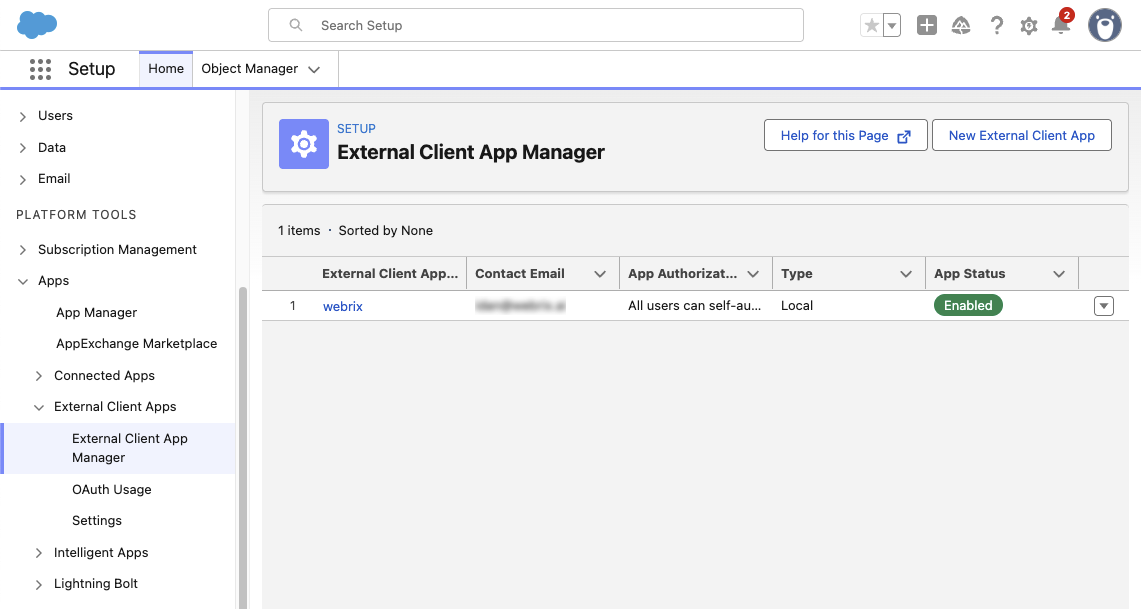
- Under Apps -> External Client Apps -> External Client App Manager -> Click New External Client App
-
Fill in the Basic Information:
- External Client App Name: Give it a descriptive name (e.g., "Willow")
- API Name: Auto-generated from the name
- Contact Email: Your email address
- Distribution State: Local
-
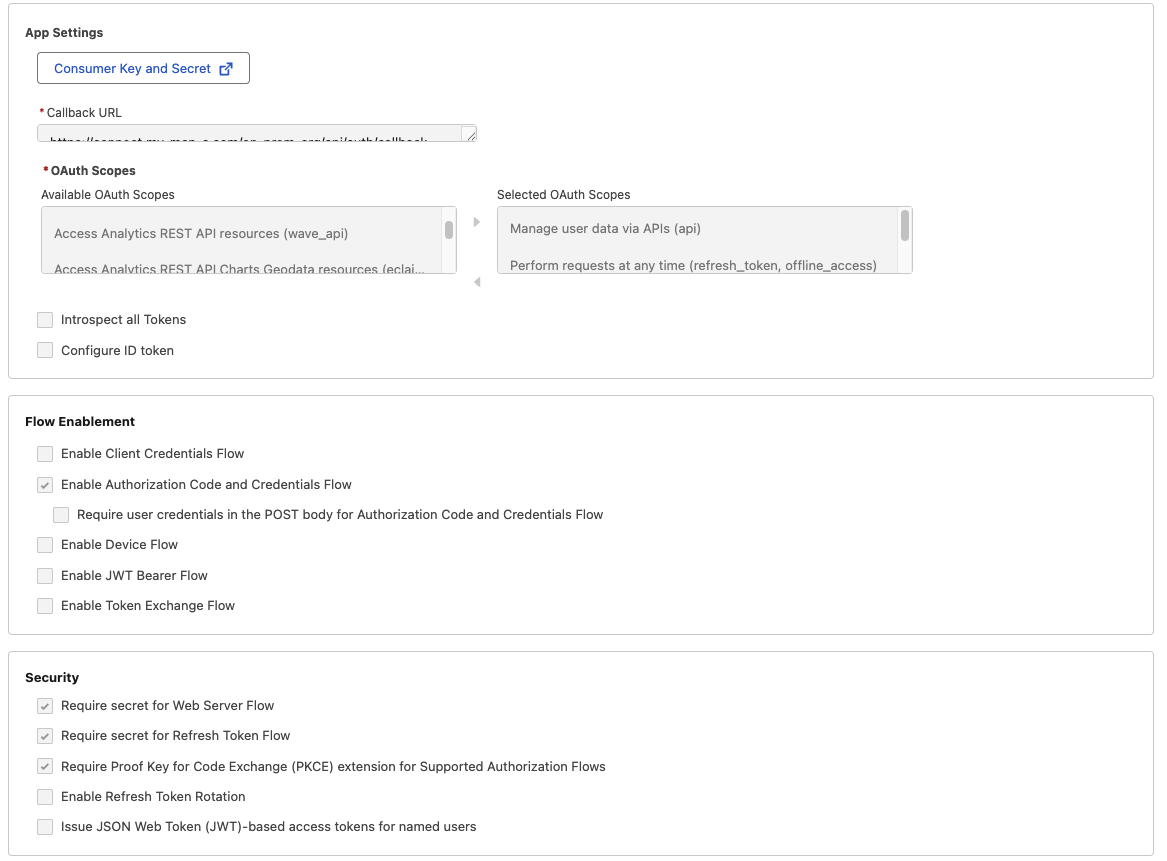
Under API (Enable OAuth Settings):
- Check Enable OAuth Settings
- App Settings
- Callback URL:
- For SaaS deployments:
https://{org}.withwillow.ai/{org}/api/auth/callback - For On-Premise deployments:
{connectUrl}/{org}/api/auth/callback
- For SaaS deployments:
- OAuth Scopes: Add the scopes you need (e.g.,
Full access (full),Perform requests at any time (refresh_token, offline_access))infoRemember the scopes - you would need to add the exact scopes in the Willow Platform
- Callback URL:
- Flow Enablement
- Check the Enable Authorization Code and Credentials Flow
- Security
- Require Web Server Flow, Refresh Token Flow and PKCE
-
Click Create
-
Click Settings -> OAuth Settings -> Consumer Key and Secret
-
Copy the Consumer Key (Client ID) and Consumer Secret (Client Secret)
-
In Willow, paste the Consumer Key and Consumer Secret
-
Enter your Salesforce Instance URL in Configuration
-
Select the same scopes you configured in Salesforce
-
Click Save Changes
Setting up Client Credentials
Use this method when no user is present to log in, such as a background agent. Willow gets a token directly from Salesforce with the app's Consumer Key and Secret, and every request runs as the Run As user you choose in Salesforce.
1. Create the External Client App in Salesforce
-
Log in to your Salesforce org as an administrator
-
Go to Setup -> Apps -> External Client Apps -> External Client App Manager -> Click New External Client App
-
Fill in the Basic Information:
- External Client App Name: Give it a descriptive name (e.g., "Willow Agent")
- Contact Email: Your email address
- Distribution State: Local
-
Under API (Enable OAuth Settings):
- Check Enable OAuth Settings
- Callback URL: Salesforce requires a value, but this flow does not use it. Enter your Willow callback URL (
https://{org}.withwillow.ai/{org}/api/auth/callback) or any HTTPS URL - OAuth Scopes: Add
Manage user data via APIs (api)andPerform requests at any time (refresh_token, offline_access) - Flow Enablement: Check Enable Client Credentials Flow
-
Click Create
2. Set the Run As user
The client credentials flow has no logged-in user, so Salesforce runs every call as a user you pick.
- Open the app and go to the Policies tab -> Click Edit
- Under OAuth Policies -> OAuth Flows and External Client App Enhancements:
- Check Enable Client Credentials Flow
- Run As (Username): Enter the Salesforce username (not the email address) of an active user. A dedicated integration user with the API Only User permission is recommended
- Click Save
The agent can only see and change what the Run As user can. Give that user a profile or permission set with access to the objects the agent needs, and API access (API Enabled).
3. Copy the credentials and find your token URL
-
Go to the Settings tab -> OAuth Settings -> Consumer Key and Secret and copy the Consumer Key and Consumer Secret
-
Find your org's My Domain URL in Setup -> My Domain (e.g.,
https://yourcompany.my.salesforce.com)
Your token URL is your My Domain plus /services/oauth2/token:
https://yourcompany.my.salesforce.com/services/oauth2/token
For a sandbox org, it looks like https://yourcompany--sandboxname.sandbox.my.salesforce.com/services/oauth2/token.
Do not use https://login.salesforce.com/services/oauth2/token or https://test.salesforce.com/services/oauth2/token. Salesforce rejects the client credentials flow on those hosts with invalid_grant: request not supported on this domain. Also do not use the browser address that ends in .lightning.force.com.
4. Configure Willow
- In Willow, create a Salesforce MCP server (or open an existing one) and choose Client Credentials as the authentication type
- Fill in:
- Client ID: The Consumer Key
- Client Secret: The Consumer Secret
- Token URL: Your My Domain token URL from the previous step
- Scopes: Leave empty. The Run As user's permissions and the app's scopes decide access
- In Configuration, set Salesforce Instance URL to your My Domain URL (e.g.,
https://yourcompany.my.salesforce.com) - Click Test credentials to check that Salesforce returns a token, then click Save Changes
Troubleshooting
Willow OAuth: "External client app is not installed in this org"
Users see OAUTH_EC_APP_NOT_FOUND: External client app is not installed in this org after signing in. The Willow package is not installed in that user's Salesforce org (a sandbox needs its own install). Ask a Salesforce admin to install it (see Install the Willow package), then connect again.
Client Credentials: "invalid_grant: request not supported on this domain"
The token URL points at login.salesforce.com or test.salesforce.com. Change it to your My Domain token URL (https://yourcompany.my.salesforce.com/services/oauth2/token).
Client Credentials: "invalid_grant: no client credentials user enabled"
The app has no Run As user. Set one in the app's Policies tab under OAuth Flows and External Client App Enhancements (see Set the Run As user).
Client Credentials: "invalid_client_id" or "invalid client credentials"
invalid_client_id means the Consumer Key is wrong. invalid_client (invalid client credentials) means the Consumer Secret is wrong. Copy both values again from Settings -> OAuth Settings -> Consumer Key and Secret, with no extra spaces.
Changes to a new or edited app can take up to 10 minutes to take effect in Salesforce, so wait and retry if the values are correct.
Client Credentials: "inactive_user"
The Run As user is deactivated. Reactivate the user in Setup -> Users, or set a different active user in the app's Policies tab.
Empty Credentials Error
If your users are prompted with the consent screen but after authorizing get an "Empty Credentials" error, this is likely due to IP restrictions in your Salesforce organization.
Solution:
- Check your IP restrictions internally in your Salesforce organization
- Go to your External Client App in Salesforce
- Navigate to Policies tab
- Click Edit
- Under OAuth Policies -> IP Relaxation -> Select Relax IP restrictions
- Save your changes