Users
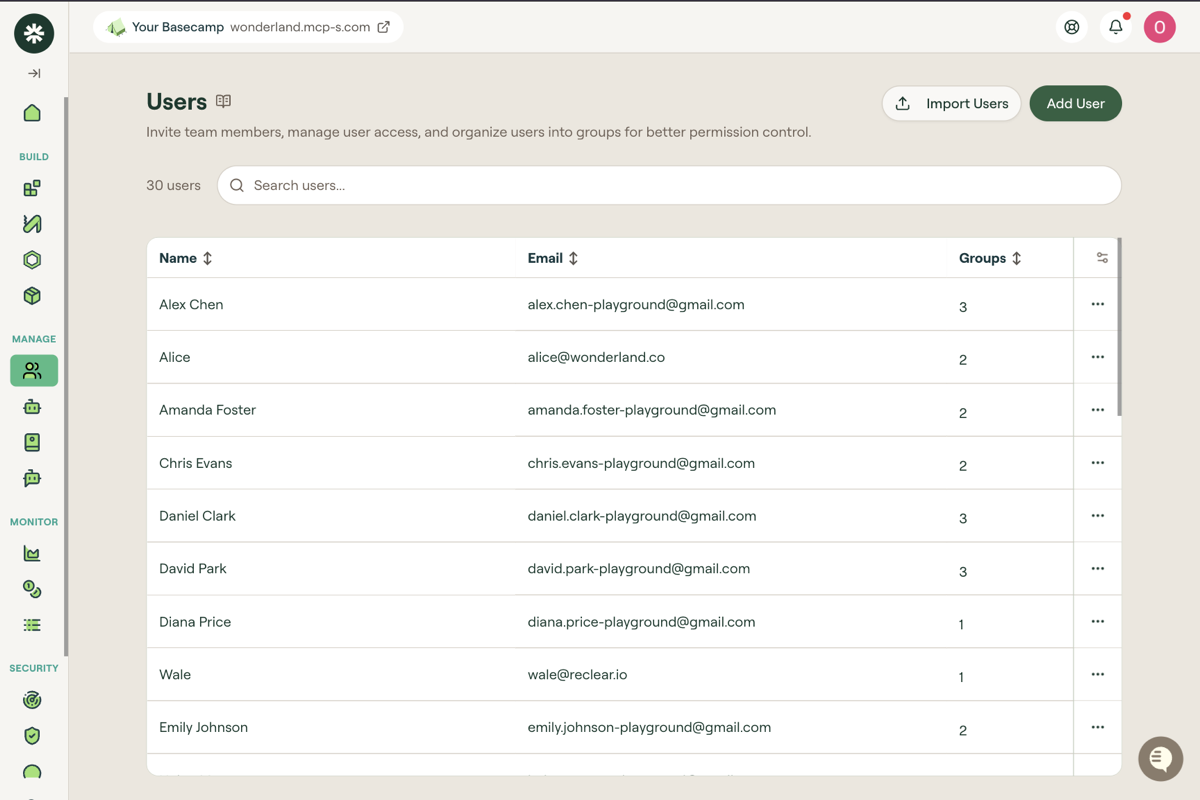
The Users page lists everyone in your organization. It is where you add people, put them in groups, and check what any one person can actually reach.
Willow grants access through groups, not through individual users. A user on this page has access to a resource because a group they belong to has it. So most work here is really two steps: get the person into Willow, then get them into the right groups.
What you can do here
- Add users one at a time, or import many from a CSV
- Send invites
- Change which groups a user belongs to
- See every MCP server, toolkit, skill, and guard a user can reach
- Remove users
The users table
The count above the table shows how many users you have.
| Column | What it shows |
|---|---|
| Name | The user's display name. |
| The user's email address. This is their identity in Willow and cannot be changed after the user is created. | |
| Groups | How many groups the user belongs to. |
| MCPs | The user's MCP servers. |
Name, Email, and Groups are sortable. Use Search users to find someone by name or email, and the All MCPs filter to narrow the list by MCP server.
The MCPs column does not list every MCP server a user is entitled to through their groups, and a dash here does not mean the user has no access. To see what a user can actually reach, use View Access.
Add a user
- Select Add User.
- Enter the user's Name and Email.
- Select Send Invite if you want Willow to email the user now. Leave it clear to create the user without notifying them, and invite them later.
- Select Create.
The new user has no group memberships yet, so they have no access to resources. Assign their groups next.
Import users from a CSV
Use Import Users when you are onboarding a team rather than a person. The import can place users in groups as it creates them, which saves assigning groups one by one afterwards.
-
Select Import Users.
-
Select Download CSV Template to start from the expected format.
-
Fill in one row per user:
Column Required What it holds Email Yes The user's email address. Full Name Yes The user's display name. Groups No Group names, comma-separated. Wrap the field in quotes when listing more than one. -
Select Upload CSV File and choose your file.
Use the exact group names from your Groups page in the Groups column.
Assign groups
- Find the user and open the ... menu at the end of their row.
- Select Edit Groups.
- Select the groups the user should belong to. Use the search box to filter a long list.
- Select Done.
Access follows immediately from group membership. To decide which groups to build in the first place, see Make MCP Servers, Toolkits, Skills, and AI Tools Available to Users.
Check what a user can access
When someone reports missing access, or you want to confirm a change landed, use View Access rather than reading group memberships and working it out yourself.
- Open the ... menu on the user's row.
- Select View Access.
The page shows the user's group memberships, counts of the MCP servers, toolkits, skills, and guards they can reach, and two views:
- Table: a card per resource type, listing what the user can reach. MCP servers also show connection status and call counts.
- Map: a diagram tracing the user to their groups, and each group to the resources it grants. Use this to see why a user has something, which is the faster answer when the access is unexpected.
Row actions
The ... menu on each row holds:
| Action | What it does |
|---|---|
| View Access | Opens the access page described above. |
| Edit | Changes the user's display name. Email cannot be changed. |
| Edit Groups | Changes group memberships. |
| Send an Invite | Emails an invite to the user. Use this for users created without one. |
| Refresh Key | Issues the user a new key, replacing their existing one. |
| Delete | Removes the user from your organization. |
Refresh Key and Delete are both destructive, and Willow marks them as such in the menu. Replacing a key invalidates the previous one, so any client still configured with it stops working until the user reconnects with the new key.