Google Search Console
The Google Search Console connector lets you query Search Console data and work with the sites and sitemaps available to the Google account that authorizes the connection.
Authentication types
For a custom Google Cloud app, configure OAuth. Willow may also show Instant OAuth, which uses Willow's preconfigured app and does not use the Cloud client described here. This guide covers custom OAuth.
Before you start
You will need:
- A Google account that can create or configure a project in the Google Cloud Console.
- Search Console access to the properties you want to use. Enabling the API does not grant access to a site.
- Your Willow Redirect URL, which is shown on the connector's Setup tab.
If Google Workspace restricts third-party apps, a Workspace admin may need to approve the OAuth client. See Approving the app for your organization.
Enable the Search Console API before adding scopes. Google Auth Platform only lists scopes for APIs enabled in the selected Cloud project.
Setting up OAuth
1. Create or select a project
Go to https://console.cloud.google.com/ and either create a new project or select an existing one using the project picker in the top bar.
Every step below applies to the selected project, so make sure the right project name is showing before you continue.
2. Enable the Google Search Console API
Open APIs & Services → Library, search for Google Search Console API, open it, and click Enable.
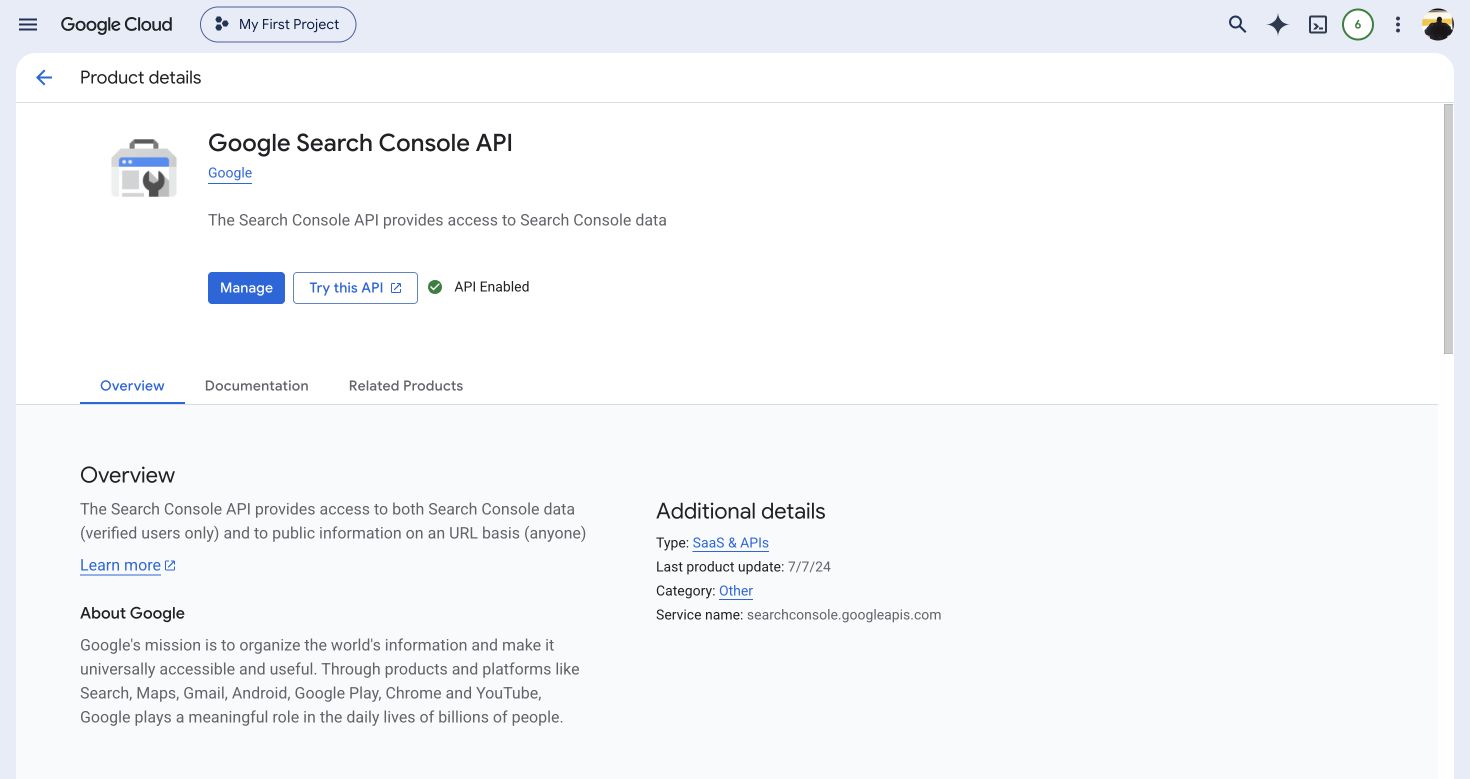
If the API is already enabled, the page shows API Enabled and a Manage button instead of Enable.
Direct link: Google Search Console API in the API Library
3. Configure the consent screen (Branding)
Google now places OAuth settings under Google Auth Platform instead of the old "OAuth consent screen" wizard. Open console.cloud.google.com/auth/branding. You can also go to APIs & Services → OAuth consent screen, which redirects to the same page.
Fill in the required fields:
- App name: What users see on the Google consent screen
- User support email
- Developer contact email
Click Save. Until these fields are filled in, the Audience page will warn that your OAuth configuration is incomplete.
4. Choose your audience
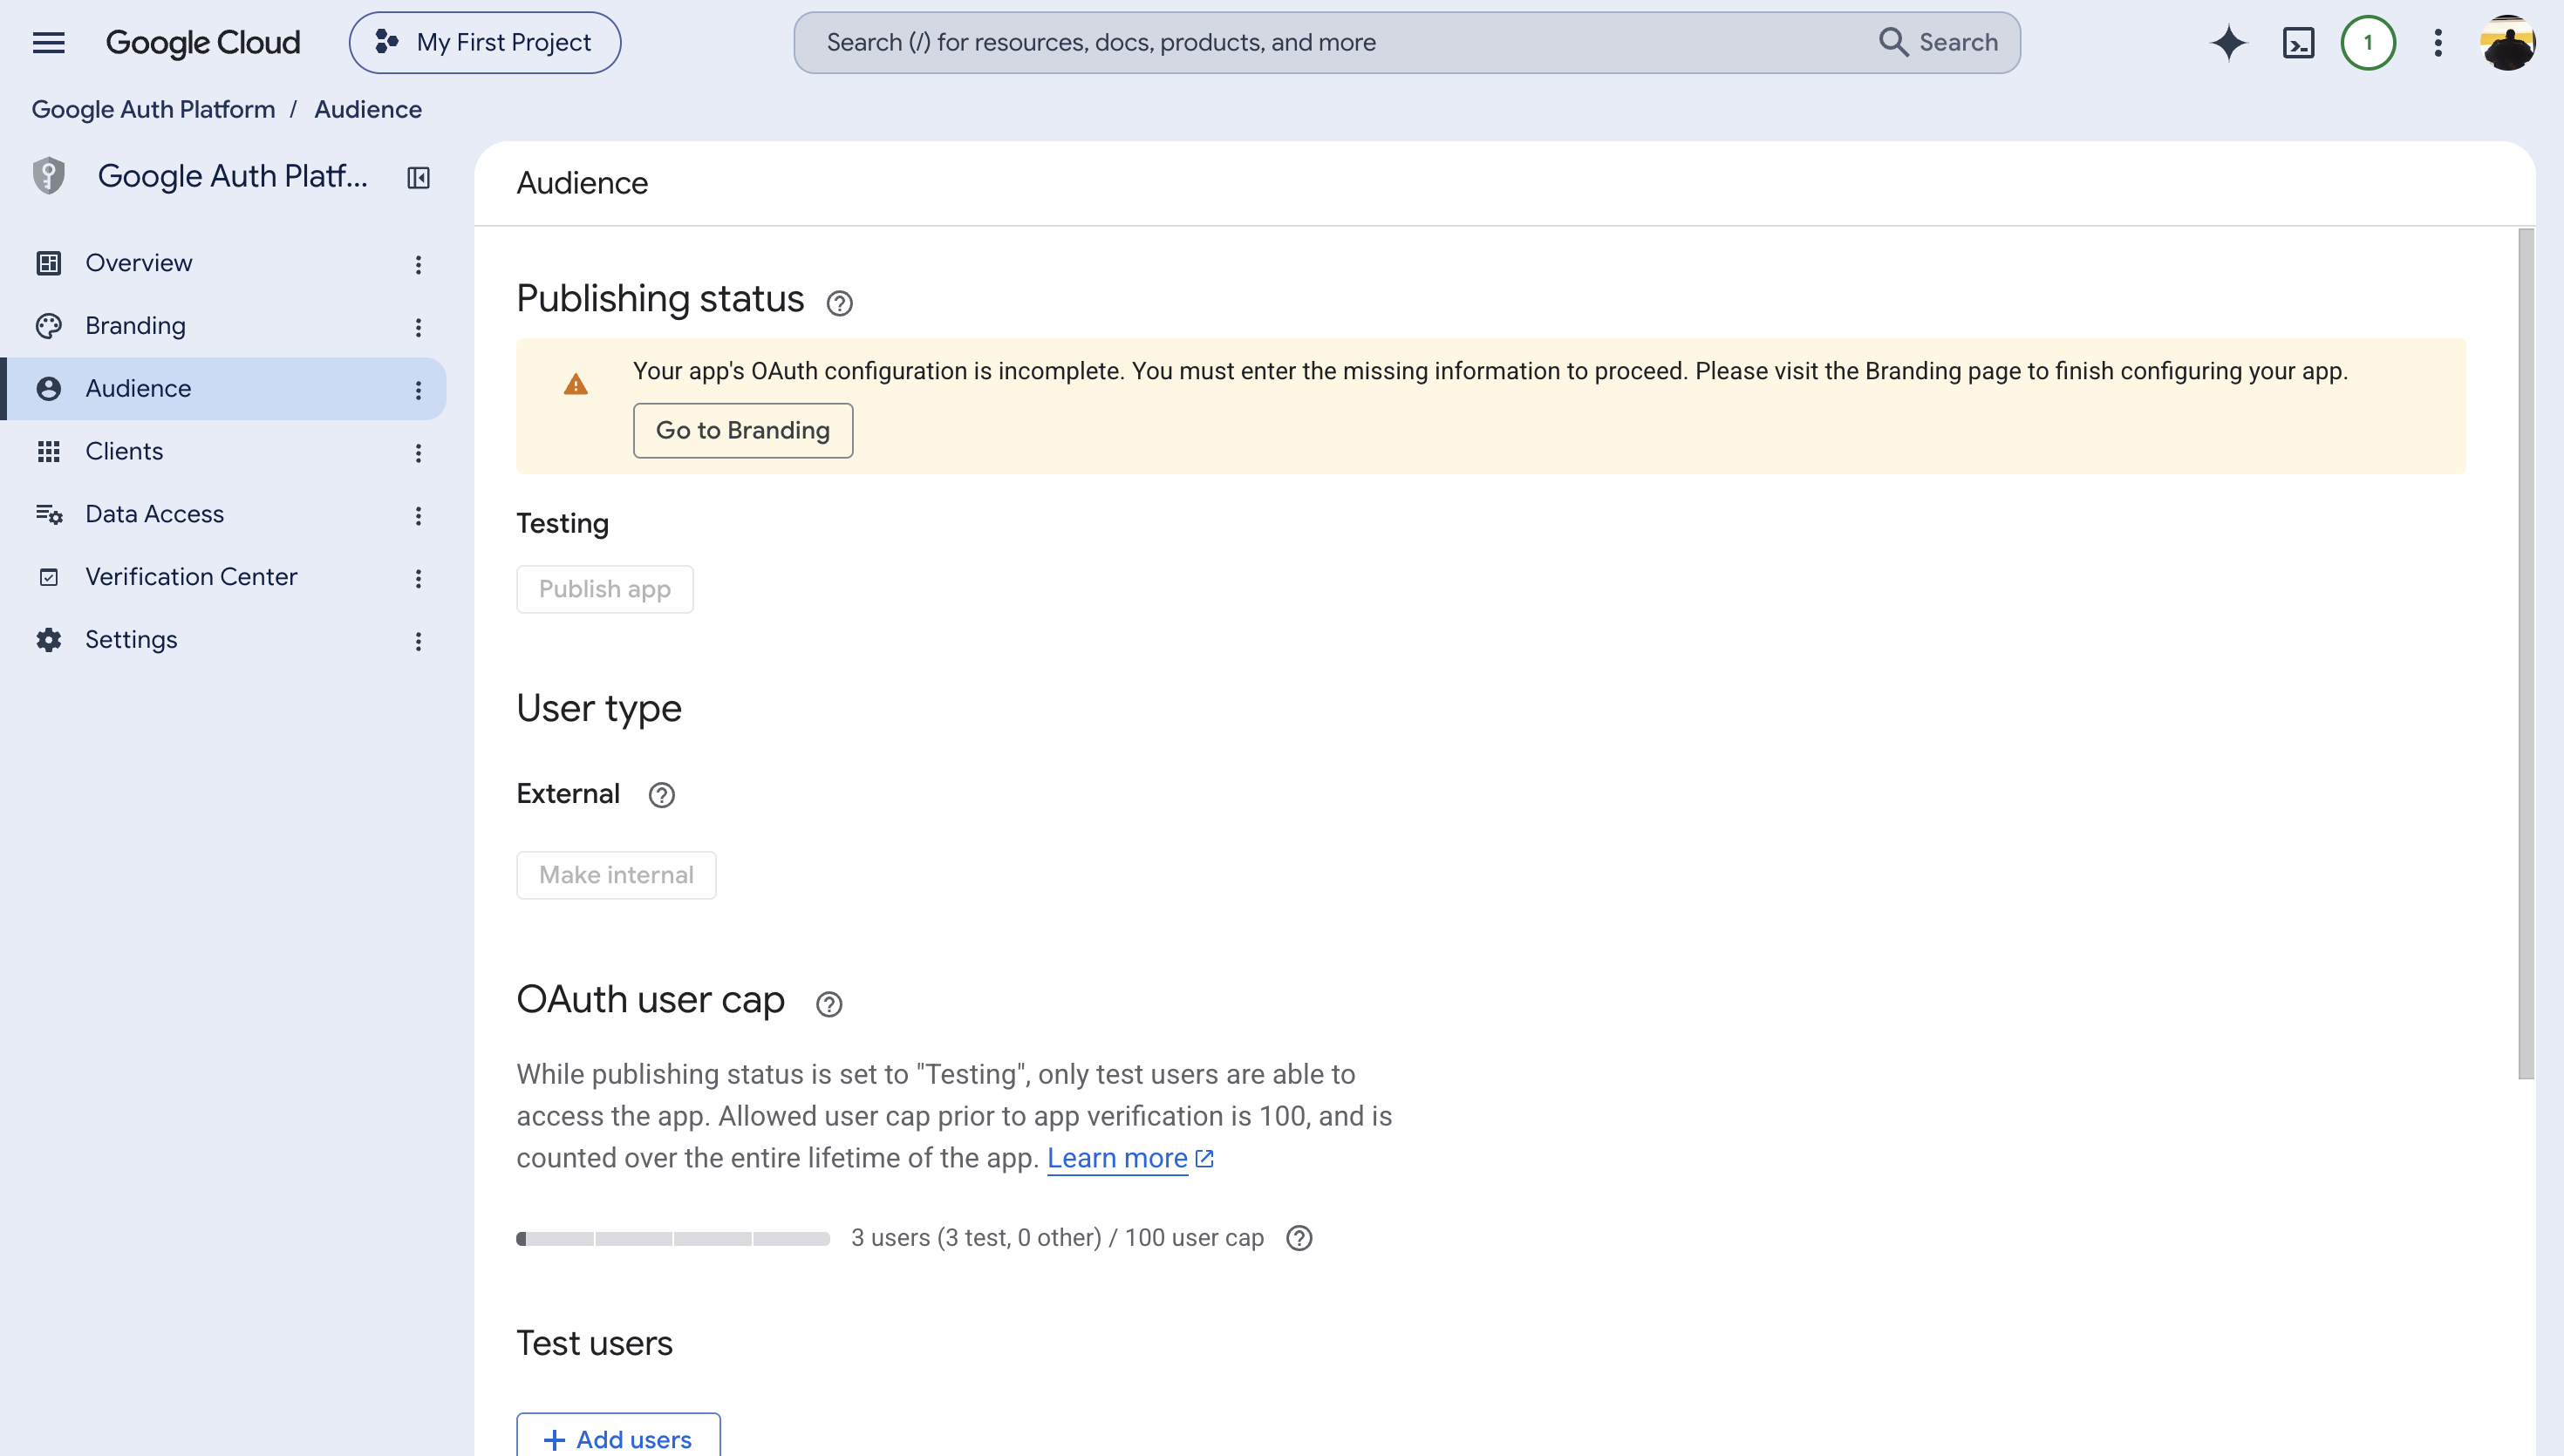
Open Audience (console.cloud.google.com/auth/audience) and set the User type.
Use Internal if you can. Click Make internal. An Internal app can be used only by members of your organization and does not need Google's External app verification.
Google offers Internal only when the Google Cloud project belongs to a Google Cloud Organization. Google Workspace or Cloud Identity provides an organization, but a personal Gmail account does not. If your project has no organization, Make internal is greyed out and External is your only option.
An Internal app may still need admin approval for restricted Google Workspace services, including Gmail and Drive. See Approving the app for your organization.
If you use External, the app starts in Testing. Only accounts listed under Test users can connect. Add each user under Test users → Add users. Anyone who is not on the list gets an error when they try to connect.
Two things to know about Testing before you rely on it:
- The cap is 100 test users over the entire lifetime of the project. It cannot be reset or changed. Each person counts toward the limit as soon as you add them, even if they never connect.
- The user's authorization and refresh token expire after seven days. Users will have to reconnect every week.
Adding a test user takes effect immediately. Until the account is on the list, Google returns Error 403: access_denied with the message "Access blocked: … has not completed the Google verification process". Although the message mentions verification, it usually means the account is missing from Test users.
Complete Branding before publishing. If the Branding page is incomplete, the Audience page shows "Your app's OAuth configuration is incomplete" and Publish app stays greyed out.
5. Add Search Console scopes
Open Data Access (console.cloud.google.com/auth/scopes) and click Add or remove scopes. Add only the scope required by the Willow tools you plan to use:
| Scope | Access |
|---|---|
https://www.googleapis.com/auth/webmasters.readonly | Read-only access to Search Console data, sites, and sitemaps |
https://www.googleapis.com/auth/webmasters | Read/write access, including operations such as managing sitemaps |
For read-only access, select only webmasters.readonly. The screenshot shows the broader options too; you do not need to select them all.
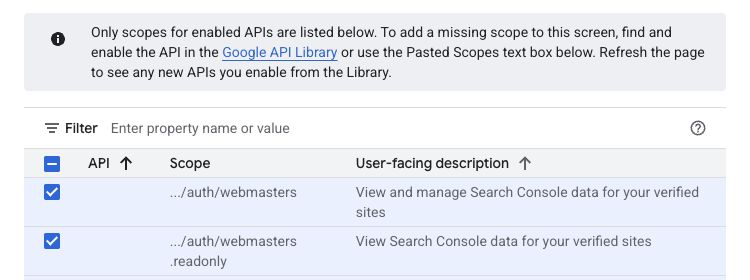
The read-only scope is the recommended starting point. If a tool needs a write operation, add the full webmasters scope as well and select the same scope in Willow.
If a scope is missing, paste its complete URI into Manually add scopes, click Add to table, and select it. Click Update, then Save.
6. Create the OAuth client
Open Clients (console.cloud.google.com/auth/clients) and click Create client.
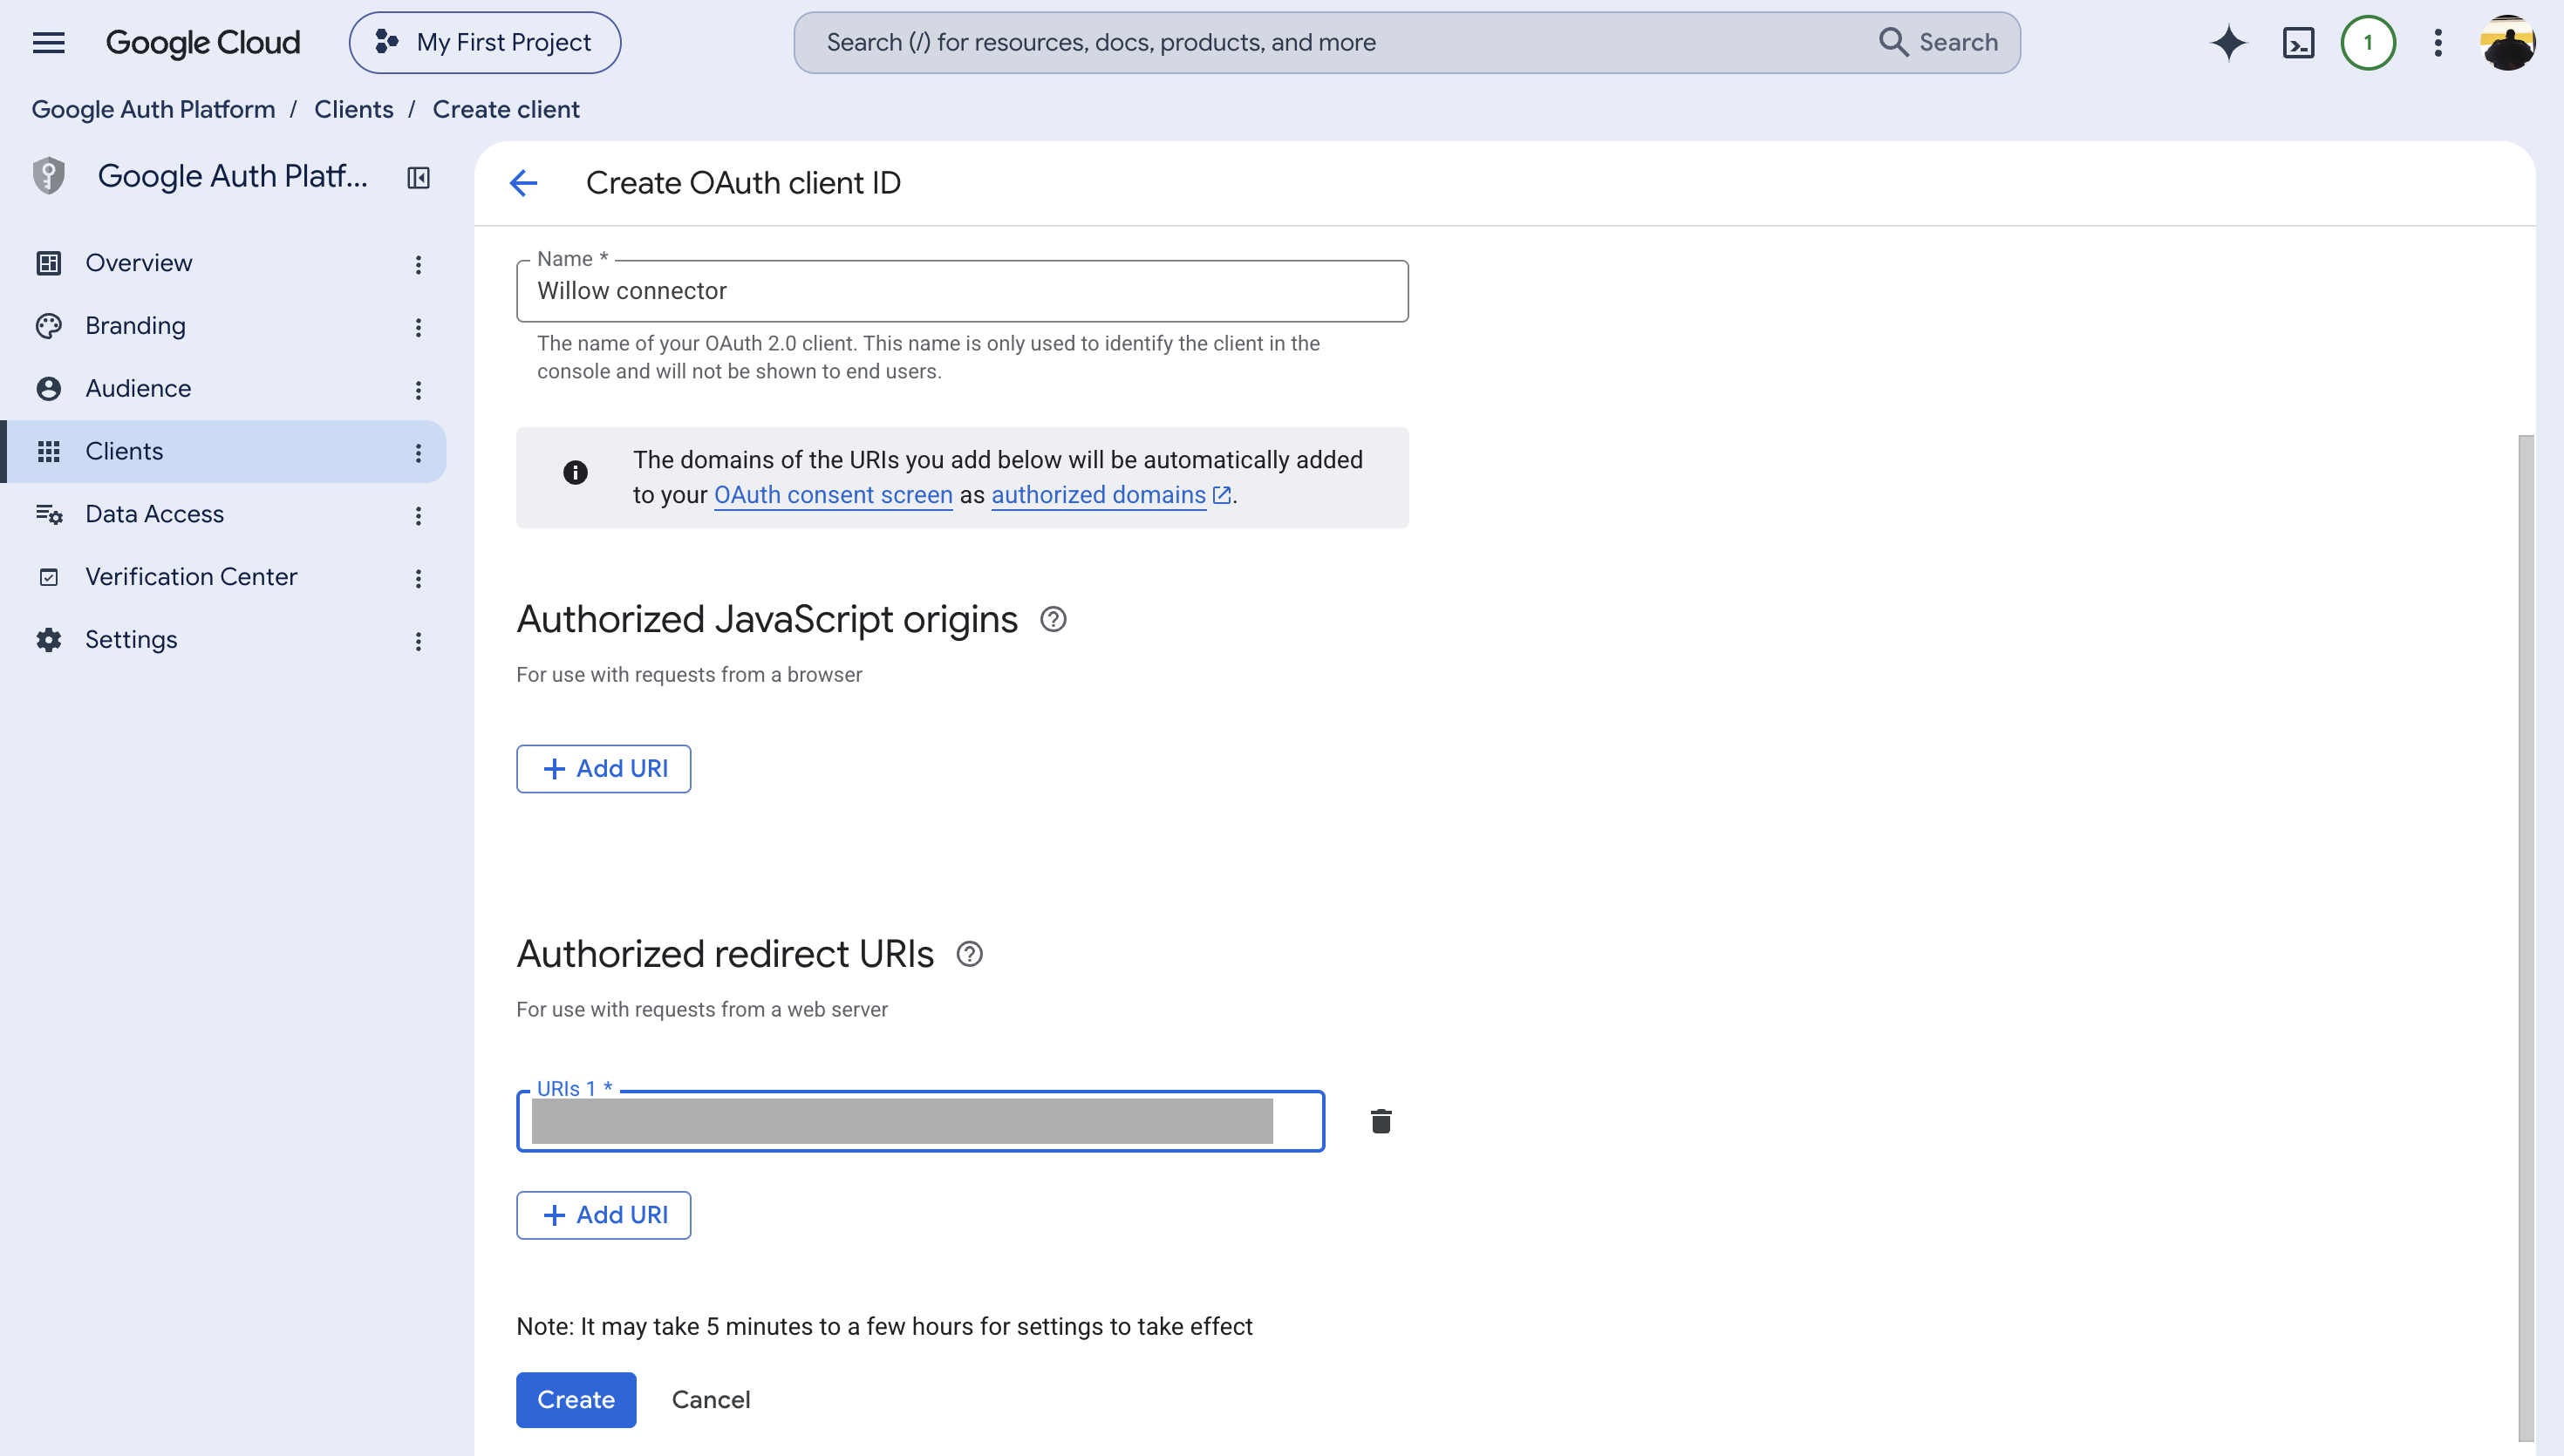
- Set Application type to Web application
- Give the client a name
- Under Authorized redirect URIs, click Add URI and add your Willow redirect URL:
- For SaaS deployments:
https://{org}.mcp-s.com/{org}/api/auth/callback - For On-Premise deployments:
{connectUrl}/{org}/api/auth/callback
- For SaaS deployments:
- Click Create
- Copy the Client ID and Client Secret
The redirect URI must match exactly, including https://, and must not have a trailing slash. A mismatch produces Error 400: redirect_uri_mismatch when you connect.
7. Finish in Willow
Open your Google connector in Willow and go to the Setup tab.
- Under Authentication, select OAuth to use your own Client ID and Client Secret.
- Paste the Client ID and Client Secret
- Confirm the Redirect URL shown here exactly matches the URI you registered in step 6
- Under Scopes, click Add and select the same scopes you configured in step 5
- Click Save Changes
Selecting a scope in Willow that you did not add in Google Cloud will fail at connect time, so keep the two lists identical.
Every connector in a Willow organization shares the same Redirect URL, so one Google OAuth client works for all of them. You do not need one client per connector. Paste the same Client ID and Secret into each connector, then select only the scopes it needs.
Select the narrowest scopes offered by the connector that meet your needs.
8. Authorize the connection
Click Check connection. It stays disabled until the credentials are saved.
Willow opens Google's consent window. It also shows an Authenticate your MCP dialog with the authorization URL and an Authenticate button in case your browser blocks the window. Complete the Google consent steps, then click I've authenticated.
An External app that requests sensitive or restricted scopes may show an unverified-app warning. If you are testing your own app, follow the available prompts to continue to consent. Publishing the app does not by itself complete verification.
If the consent window does not appear, use the Authenticate button in the dialog.
Test a read-only tool
To test the connection, go to the Tools tab, open the row menu for a read-only tool, and choose Test Tool → Run test. A successful run returns data from Google as JSON.
Use an existing resource that the authenticated account can access. A 401 response indicates an authentication problem; a 403 or 404 can also indicate missing permissions or an inaccessible resource, so an error alone does not confirm a working connection.
If a tool returns Tool blocked by organization's guardrails, check the matching Willow Guard. The response was blocked by a Guard; changing OAuth scopes will not fix that block.
Approving the app for your organization
Google Workspace admins can restrict which third-party apps may access organization data. When this restriction is on, users may see an access-blocked message naming their Workspace admin or an admin-policy error, even when the OAuth setup is correct.
A Workspace super admin fixes this in the Admin console. From the Admin console, go to Menu → Security → Access and data control → API controls, then click Manage App Access.
To add an app that is not listed yet:
- Click Configure new app
- Enter the app name or the Client ID from step 6, then click Search
- Select the app and click Continue
- Under Access to Google data, choose Specific Google data and allow the scopes your connector needs, including any required Google Sign-in scopes. Choose Trusted only if your organization intends to allow the app to request all Google services, including restricted services.
- Click Continue, then Finish
To change an app that is already listed, point to it and click Change access. To update several apps, select them and click Change access at the top. Use Select org units → Include organizations to choose which parts of your organization receive the change. Leave the top-level organization selected to apply it to everyone. Then confirm with Change access.
The access levels are Trusted, Limited, Specific Google data, and Blocked. Specific Google data permits the scopes you approve, including scopes for restricted services. Trusted permits access across all services.
Internal apps also need approval if your organization restricts unconfigured third-party apps. See Google's guide, Control which third-party & internal apps access Google Workspace data.
Verify the connection
After authorization, open the connector's Tools tab and run a read-only tool. Start by listing the sites available to the authorized account, then query a property that account can access in Search Console.
If no sites are returned, confirm that the authorizing Google account is a verified owner or user of the property. The Cloud project and OAuth client do not replace Search Console property permissions.
Search Console property access is separate from OAuth
In Google Search Console, confirm that the authenticated account has access to the property. Use the exact property identifier when a tool asks for the site URL: https://www.example.com/ for a URL-prefix property or sc-domain:example.com for a domain property.
The property is not found
OAuth can succeed while a property lookup fails. Check the property identifier and the authenticated user's access, then ask a property owner to add the user if needed.
Publishing and verification
An Internal app is limited to users in the Cloud project's organization. If Internal is unavailable, use External and add every connecting account under Audience → Test users while the app is in Testing. Testing authorizations expire after seven days. For production use with external users, publish the app and follow Google's verification requirements for the scopes shown on the Data Access page.
Troubleshooting
| Symptom | Cause |
|---|---|
| Required scopes missing from the scope picker | A required API is not enabled in the selected project. See step 2. |
Error 400: redirect_uri_mismatch | The Redirect URI in the OAuth client does not exactly match Willow's Redirect URL. |
org_internal error | The app is Internal, but the user does not belong to the organization that owns the Google Cloud project. |
Error 403: access_denied: "Access blocked: <domain> has not completed the Google verification process… can only be accessed by developer-approved testers" | The app is External and in Testing, but the Google account is not in Test users. Add the account on the Audience page. This is a test-user error, not a Workspace admin approval error. |
| "Access blocked" that names your Workspace admin, or persists for an account already listed under Test users | Workspace admin has not trusted the app. See Approving the app for your organization. |
| Users have to reconnect every 7 days | App is External and still in Testing. Authorizations expire seven days after consent. |
| Make internal is greyed out | The project does not belong to a Google Cloud Organization |
| Publish app is greyed out, with "Your app's OAuth configuration is incomplete" | Branding is unfinished. Fill in the Branding page first. |
Tool call returns {"error":{"type":"Tool Error","message":"Tool blocked by organization's guardrails"}} | A Willow Guard blocked the response. Check Guards for the matching rule and result. |
For the API's authorization model and scope meanings, see Google's Search Console OAuth authorization guide.