Create your first background agent
In this tutorial, you will create Repository Briefing, an agent that reads a public GitHub repository and reports its owner, URL, and default branch. You will run it on Willow Agents and give it one read-only tool.
Before you start
You need:
- admin permission to view, create, and edit background agents;
- Willow Agents enabled under Build > Background Agents > the settings gear > Agent Types;
- a GitHub MCP server using Instant OAuth, with Get Repository available;
- a GitHub account you can connect to that server;
- at least one remaining Willow Agents session credit.
If the GitHub server or tool is missing, complete Add and configure an MCP server before starting. The platform reference describes credits. This lesson uses a new session, which consumes one credit.
1. Create Repository Briefing
Open Build > Background Agents and select Create Agent. Fill in:
| Field | Value |
|---|---|
| Name | Repository Briefing |
| Description | Read a GitHub repository and report its owner, URL, and default branch. |
| Platform | Willow Agents |
| Channel | None |
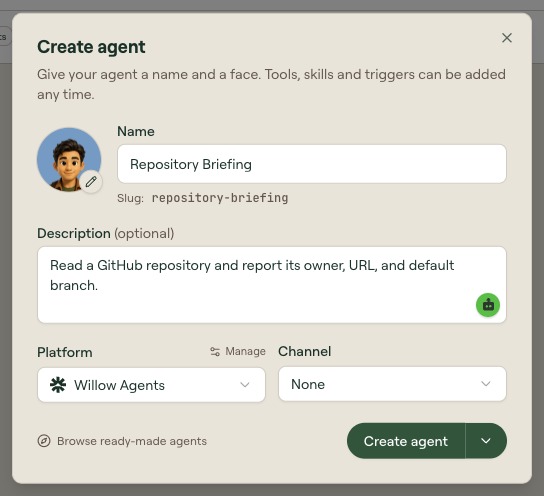
Select Create agent. Open the new agent's Overview tab. You now have a definition to configure; deployment and tool access are the next steps.
2. Save its instructions
Paste this into System Prompt on Overview:
You create briefings for public GitHub repositories.

When given an owner and repository name, call Get Repository with those values.
Return the repository name, owner, URL, and default branch from the tool result.
Only read repository metadata. Do not create or change repositories, files,
issues, comments, or pull requests.
If the tool call fails, report the error instead of inventing repository data.
Select Save. Leave the model at its default under Settings > Platform Configuration for this lesson.
3. Add one GitHub tool
- Open Tools and select Add Tools.
- On Your MCP servers, search for
GitHuband expand your server. - Select Get Repository only.
- Select Add tools with one tool selected.
Confirm that Get Repository appears and is enabled. The agent should have one GitHub tool. Leave write and delete tools unassigned.
4. Connect your GitHub account
On the GitHub server group in Tools, open Auth not set. Select Connect my account · Instant OAuth, then Connect GitHub.
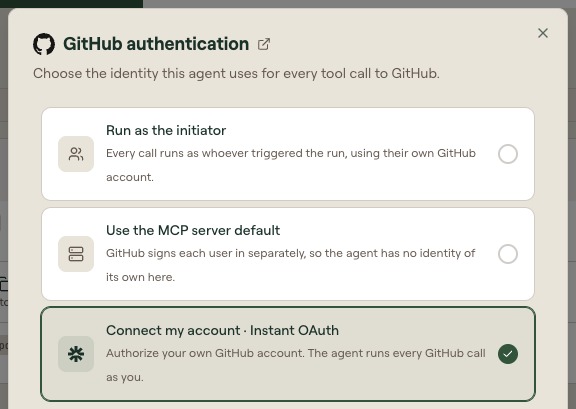
Complete the GitHub connection. Return to the agent's authentication dialog, confirm it shows the account you intended, and select Save. The tool can now use that account when this agent runs.
The account used for GitHub calls is separate from the agent's gateway identity. See How background agents work when you want to explore that distinction.
5. Deploy the definition
Select Deploy in the agent header. After deployment, return to Overview and check the Synced state, version, and deployment time. Confirm that Active is on.
Willow Agents receives its gateway credentials through deployment; you do not need to generate or copy a gateway secret for this lesson.
6. Test the agent
On Overview, select Test and send:
Use Get Repository to read owner octocat, repository Hello-World.
Report its repository name, owner, URL, and default branch.
This is the public octocat/Hello-World repository. Compare the reply with the Get Repository result. You should find these fields:
| Field | Expected value |
|---|---|
| Repository | Hello-World |
| Owner | octocat |
| URL | https://github.com/octocat/Hello-World |
| Default branch | The default_branch value returned by the tool. |
Response wording can vary. The field values must come from the tool result. If authentication fails, return to the GitHub authentication selection in Tools and confirm the connection was saved; see Troubleshooting.
7. Inspect the evidence
Return to the agent's Sessions tab and open the conversation. Find the Get Repository call, check the owner and repository arguments, and compare the returned data with the answer.
Then open Monitor > Logs and find the corresponding GitHub gateway call. Check its result and agent identity. See Investigate with Logs for the log controls.
You have finished when the agent has one enabled GitHub tool, a saved GitHub authentication identity, a deployed definition, and a successful Get Repository call whose result matches its answer. A response without the tool call does not complete this check.
8. Pause the example
Return to the agent and turn Active off. Its definition remains available when you want to use it again. Re-enable it before another run; starting another new Willow Agents session consumes another credit.
Continue with your own workflow
- Create and configure an agent for a different job or a ready-made starting point.
- Give an agent access to tools from other integrations.
- Connect an agent to Slack when you want to use it from a channel.